Reviving the Polyfoto
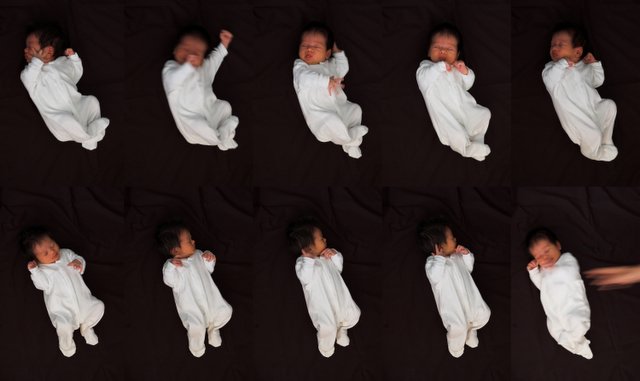
One day I was pondering Muybridge and what to do for a photoshoot with our newborn, Amelia. Setting up an elaborate spread of trip wires and cameras seemed somewhat premature particularly as the outlay on the DSLR had been a relatively significant one, health and safety issues needed to be taken into account particularly as they pertain to the small child if not moreso with regards to how they might apply to parents working on far less sleep than normal, and it wasn't as though she were moving in a great hurry anyway.
We'd already purchased a red velvet textured cloth and a black cloth prior to Amelia's arrival knowing they would probably come in for something useful and hopefully something photographic at that. Striking upon a not at all novel idea, but one that none the less was sure to prove fun in the undertaking, we came up with the opening image to this entry. I'm sure even the intercession of the hand was lifted from elsewhere, but I do forget entirely where for the time being.
Upon submitting the result to one of an increasingly shrinking number of online photographic fora I subscribe to, one of the members mentioned that it reminded him strongly of a Polyfoto he had in his posession.
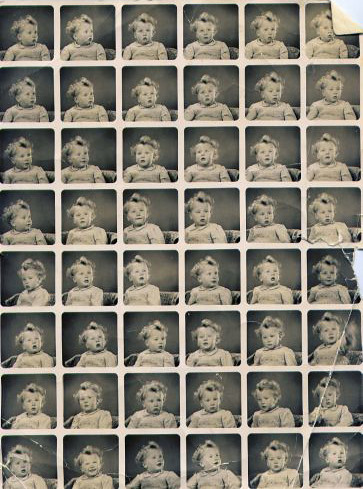
1954, East Ham, London
5/- (5 Shillings) was charged for the initial sheet of 48 images
Extra would have been charged for individual reprints and enlargements
I was immediately enchanted by this mode of presentation and intrigued in equal measure by the method that lay behind it. Here was not merely a series of individual images of a toddler, each one compartmentalised in time, but a collage of individual moments tightly knitted together in one energetic whole. Amidst individual frames that might indeed have been selected for showing the toddler at its best, smiling or laughing or at least looking in the right direction, all manner of nuances creep in to the overall result that might within other context be left in the photo wallet or deleted from the memory card. Here they mingle with and breathe alongside the traditional keepers to establish a rhythmic encapsulation of an elongated moment in a person's life.
Finding cohesive and coherent information on the Polyfoto proved to be difficult with only a few mentions here and there online and the odd image reaching the surface of a plethora of eclectic archives.
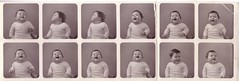
Image courtesy of David Quick
Daniel Meadows has produced a highly engaging online movie which may be viewed at photobus.co.uk. Ed Buziak pays hommage to the importance of the Polyfoto and all forms of photographic record of the family in his blog. Some examples from the 1950's are on display at the Science & Society Picture Library Web site. Sue Limb relates her childhood Polyphoto experience in an endearing article. A couple of larger scale scans of Polyfotos are linked from kingskill.com. Last but not least another particularly nice example can be found in David Quick's Flickr photo stream.
My search culminated in the best manner possible however when I stumbled across Colin L., a former employee of Polyfoto in England, since emigrated to Albany in Western Australia. Colin kindly agreed to share of his memories and also of some fine examples of the Polyfoto form, thus it is with pleasure that I hand you over to him and his delightful story in his own words and pictures.
My start was as Lab Boy for Dufay film doing all the jobs no one else wanted. When the film manufacture stopped in 1959 and because the company had been taken over by Polyfoto some years before I walked into a new job working in the dark rooms.
Polyfoto for many years was the household word in the UK for portraits. In over 250 cities and towns Polyfoto studios could be found. What set Polyfoto apart from other photo studios was the price and how the pictures were taken. Polyfoto studios used a plate camera that took 48 images just under 1 inch square. Exposed plates were wrapped in black light tight paper and dispatched to the factory for developing.
The cameras were of Danish design and made under license in England. Made from cast metal and very large the size was about 8 inches thick and 2 foot square. It was so heavy a normal tripod couldn't be used so special stands were used. They were a bit like x-ray camera stands used in hospitals.
This camera took one single 5 x7 inch glass negative for each sitting. The first thing done before any sitting was in the dark room the negative plates were loaded in light tight film holders.
On the top of the camera was a small door where the film holder was inserted but before any pictures could be taken a cover slide on the front of the holder was removed and all was ready for the sitting.
On the top of the camera was a small door where the film holder was inserted but before any pictures could be taken a cover slide on the front of the holder was removed and all was ready for the sitting.
All the studios were very small and the background was a standard light grey with no flash lighting but 3 or 4 incandescent lamps always placed in the same place on the floor so each studio had the same standard set up. Also on the floor were distance markers with the same numbers used on the focus ring of the camera.
A normal sitting would go like this.
The camera is loaded and the lights turned on, the person being taken would sit in front of the camera, the photographer would check they were in the correct position by viewing through a small window on the side of camera, then a board with studio prefix and sitting number was placed beside the person (this was on the first exposure only) and all is ready for the first exposure. On the side of the camera is a small hand wheel. This was slowly turned. The first thing this did was trip the shutter and the first picture is taken, then as it was slowly turned it reloads the shutter for the next exposure and moved the negative along one space. As the exposures are made the photographer points to where the person should be looking. After the first six exposures a button on the top of the camera pops up and as it is pushed down the negative moves down for the next six pictures. As soon as all 48 pictures have been taken the cover slide was reinserted and the negative holder could now be removed form the camera, ready for dispatch.
The Polyfoto factory was a large double story building located in a village north of London. All production was on the ground floor with office and storage on the upper floor.
Photography has changed over the years. When I started it was all manual. Then things became automated. It wasn't that far back the first one hour labs started. Now the whole world has gone digital and any photographer can work from home using the home computer.
In the late 1950's it was a different story. Very few 35mm cameras were on the market and most people would still be using roll film medium format cameras using black and white film. Very little colour film was taken (hand coloured prints were still very much the main choice for many people). Once the B&W film had been exposed it could be processed at home or many chemists had a D&P service. Once developed the film was printed not as 6x4 as all the labs print today but as small same size contact prints and the high street photographer could still make a good living.
The bottom rung on the ladder for myself was dogs-body in the negative processing department. Monday and Tuesday were always the busy days. Outside the negative processing room was a long bench and as soon as the first post arrived this bench would be covered in boxes of negatives. Each box had the details from a studio and the total amount of negatives in each box. The boxes were quickly sorted into piles of not more than 36 negatives.
The bottom rung on the ladder for myself was dogs-body in the negative processing department. Monday and Tuesday were always the busy days. Outside the negative processing room was a long bench and as soon as the first post arrived this bench would be covered in boxes of negatives. Each box had the details from a studio and the total amount of negatives in each box. The boxes were quickly sorted into piles of not more than 36 negatives.
The dark room was a about 20ft x 15ft. Down one side was a bench for loading the film racks. Under the bench was the storage for the film racks and at one end a very large bin for the fixer crystals and a vat of developer replenisher along with chemical testing equipment. The developing fixing tanks were in the centre of the room. Each tank would have been about 8ft x 2ft and set in a water jacket plus a small stop bath tank. On the other side could be found wash tanks and on the opposite wall drying cabinets.
You entered the darkroom via a light trap. When developing the film the only lights were just a couple of very dim dark green safe lights. It also had normal white lighting but the only way these lights could be turned was by using a special key.
The first batch of neg boxes were lined up on the bench next to a dry developing rack. The racks were made of stainless steel and had slots for each neg and a handle each. The developer temperature was checked and a timer pre-set for the required developing time. Out went the lights, the boxes were unwrapped and the negatives slid into the racks. About 10 to 12 racks would have been loaded for each run.
Then processing would start. The first rack would be placed in the far end of the developing tank and given a good dunking and the timer would be started. Then one by one all the other racks would be added. As the developing continued each rack in turn would be given a shake up. As soon as the timer bell sounded the first rack was removed, placed in the stop bath then the fixer and then the same for all the others.
The white light could be turned on in 5 minutes or so. The next job was to tally up how many plates had been processed and replenish the developer. By now this first batch was fixed and transferred to the wash tank. Iodine was used to check the fixer. A test tube full of the fixer was mixed with a few drops of the iodine. If it looked clear the fixer was fine but if the change was milky the fixer was no-longer any use and dumped, not down the drain but to a silver recovery machine. The last stage before drying was a wetting agent bath. This stopped any water marks.
In 1950 the Polyfoto darkroom only printed in black and white. Although a colour lab was started after some years, during those far off days black and white prints were still hand coloured. The printing dark room was very large at one end with a small bay for chemical storage and racks for negatives waiting for printing. In the centre of the room sets of china sinks were arranged in blocks of four. Each printer would have two sinks. In the first one would be a couple of metal processing trays, one for the developer the other for wash (stop bath). The other sink was for the fixer. Then running down each wall were the enlargers on one side - fixed focus enlargers for printing the 48 proof sheets - and on the other side De Verre enlargers (custom made just for Polyfoto) for printing individual frames. Also there was half a dozen small reflex type of printers that weere used for printing passports from paper negatives.
The 48 sheet fixed focus enlargers - from memory there could have been 7 or 8 of them, each one mounted on an metal frame - looked like a large wooden box with a lamp. This was a cold cathode type that gave a very blue light that was left on all day. It had a 10-15 minute warm up time so the first person in the darkroom each morning would turn all the machines on. On the top in the front was an orange plastic window (so the light would not fog the paper) and slide for the glass negative. On the side was a small lever that removed an orange filter so the exposure could be made. On the base was the easel that held the paper. Placed at one side of each enlarger was a paper storage safe.
As soon as the room lights were turned out and the safe lights turned on the printer would sit at the enlarger with a pile of negatives on the side and the paper safe would be opened. The first negative would be placed in the tray and pushed into enlarger. The orange filter would be turned to the open position and the image could be seen on the easel. The printer could estimate the required exposure time and the required grade of paper. No meter was used; just the printers knowledge of negative density and contrast! Then the easel would be moved about until the image was in the correct position and the orange filter turned to the closed position. A sheet of bromide photo paper was taken from the paper safe and placed in the easel, the filter opened and without any timer the exposure was counted … 1 2 3 4 … after the required time the filter was closed and the exposed sheet was placed in the bottom of the paper safe. Anyone who has done any printing would have made test strips. This was not the case working in the Polyfoto dark room. You could make one test at the beginning of the day and that was all. After the batch of negatives (about 40 negatives in each batch) had all been exposed it was time for processing. About 10 sheets were developed at a time. As soon as all had been developed it was time for the next batch. The required rate for the 48 proof sheets was 30 per hour. Once the prints were in the fixer this was the last the printer had any thing to do with them. Washing and drying was carried out in the next department.
The machines used for individual enlargements made by De Vere were bolted to the wall. The base board could be lowered for large prints. Just under the base board were two wheels that controlled the magnification and focus. Linked by chains,, the lens panel and negative carrier could be raised or lowered. The negative was held in a movable carrier because only one image was projected at any time. The carrier could move in all directions. Next to the negative was a glass plate with all the numbers 1-48. As the negative was moved so would this plate. The frame number would show up in a small port hole and viewed by a mirror. The same type of paper safes as used by the 48 sheet printer were used by the custom enlargement guys, the only difference being the bromide paper was cut in several sizes.
1/4 plate 5x4 inches
1/2 plate 6x6
1/1 plate 8x6 10x8 and 12x10
For exposing the paper the lamp was turned on by pressing a foot switch There was no orange safety filter as on the 48 sheet machines but these enlargers had two globes, a normal white one for the exposure and the other was red. What the printer did was put the neg in the carrier and find the frame required then press the foot switch and the white light would come on, adjust the size etc. then removing his foot from the switch the white light would go out and the red one would be switched on, placed the paper in the easel then pressed the foot switch for the exposure.
The 48 sheets where projected and never contacted printed but a change of camera was made in the 1960's and for just a few weeks contact prints where used.
After the batch of negatives had been processed the printer would take them and place them in a cubby hole located in the wash and drying room. Also the printer would tell the person who was in charge how long the prints needed in the fixer before washing.
This was a nice and bright place but very warm. Down one wall banks of washing basins would be full of swirling water. Each bank of sinks had three basins. A jet of water entered from one side and as soon as the basin was full it automatically started a siphon phase. Once the prints had been washed drying was carried out on large gas heated rotary dryers.
The other thing done in this room was sepia toning. Polyfoto used the name 'En Vouge' for toned prints. The process was very simple. The wet washed prints were place in a tray of bleach. This was a mixture of Potassium Ferricyanide and Bromide. In this bleach the image would become very light and change to a shade of yellow. The prints received a short wash and the next stage was the toning. This was done with sodium sulphite. You would also know when someone was toning because of the bad smell from the sulphite, just like bad eggs.
Once dry the prints were checked for exposure, contrast and any surface damage. Rejected prints were sent straight back for re printing. Custom enlargement would next go for retouching. The 48 sheet had a decal edge. This was done using a metal cutter and an old fashion shoe machine (its role would have been cutting out leather parts for shoes). With this machine 20 or so prints could receive the decal edge at the same time.
Don't forget this was in the days before resin coated papers. In the late 50’s portrait photographers would use medium to large format and in most cases the negatives would be retouched but because the image used on the Polyfoto system was so small the prints were retouched rather than the negatives and dark marks could be scraped away using a very sharp blade.
Any print that needed colouring was first sepia toned. This made the colours look brighter. Many colours would not work if applied on the black and white image but were fine on the brown toned one. The colours came in two types. The first was water based. It was mixed with gum arabic and kaolin that was sprayed on using an air brush. The other type was a transparent stain that was brushed on then sprayed with gum.
Once the gum was dry the prints were mounted in folders, not the slip-in type photographers use these days but dry mounted. The process was that on the back of the print a sheet of shellac coated tissue was attached using what looked like an over sized soldering iron. The paper was tacked on the back of the print then trimmed and placed on the mount and the corners were tacked. Then it was into the press. Heat melted the shellac and pressure bonded the surfaces. A final check was made then into an envelope ready for dispatch.
A few facts (being nearly 50 years ago some of the names may not be 100% correct):
glass negatives were made by Kodak, type P303, just under 5X7 sizeNegative developer: Kodak D76
Negative fixer: hypo crystal from Johnson of Hendon
Print developer made for Polyfoto in bulk by Johnson of Hendon
Paper: Kodak bromide and Gevert cream colour bromide paper
48 printer lenses - Taylor Hobson, about 8 inch focal length
Custom enlargers - De Verre Lenes Rodonstock 40mm and 70mm
Each studio had its own prefix – e.g.: 'LE' was Kensignton, 'AB' a large store in Oxford St.
The working week was 40 hours and pay in 1959 as lab boy was about 3 pounds per week. The rate for printers was just over 12 pounds plus at Christmas time a bonus was paid. Each print size had its own target rate. For the 48 sheet it was 30 per hour. The bonus rate for 48 sheets was just 1 penny per print for extra prints over the target of 30.
The original factory was located at the North London town of Stanmore. It was later relocated to the Hertfordshire village of Boreham Wood. I have no idea when but feel it could have been in the very early 1950’s. The factory entrance was quite a land mark in those early days being on part of the Dufay film site. The original entrance next to the old post office in the main street had large gates and on each side columns. The main features were two large cement spheres. By the late 1950’s the entrance had been relocated and what was a once grand statement was redeveloped into a row of shops .The Polyfoto double decker bus was a common sight around Boreham Wood. Sign writers had covered it in extra large 48 sheet prints and adverts for special deals that were on offer. A good thing about Polyfoto was the fact that the management looked after its staff. Production targets may have been strict and the pay not that good but you got other perks. The Polyfoto bus, besides being a mobile advert, was also staff transport. After the move from Stanmore many workers stayed with the company. The bus would pick them up each morning and take them back in the afternoon.
With hundreds of studios all over the UK the funny thing is there was no studio in Boreham Wood. The nearest was at Watford and some time later one opened at Barnet.
Around 1967/1968 Polyfoto was on the move again. This time the new home was Watford, but from this point on I haven't a clue what the outcome was. I guess it must have closed down, but when?

posted by khon_fused at 6:41 am
![]()

7 Comments:
My mother age 92 has just unearthed my polyfoto sheet, as at 55, my first son has just been born. The similarity between he and I is unmistakable and I am fascinated to read the history of Polyfoto. It would be great to get some enlargements of the images, do you know if it is possible
Thanks for dropping by and glad you enjoyed the read Paul. The one key detail I still haven't resolved is what happened to Polyfoto and thus indeed, is the technology they used still accessible somewhere? I don't imagine it will be in any commercial capacity at least thus we're left with the best that modern technology affords us I suppose - scanning the original prints at the highest available resolution before printing at a larger size. I wonder what happened to their archives of negatives!
Interesting information.
Here is another example of Polyphoto photos:
http://www.flickr.com/photos/asisawit/3083287622/?addedcomment=1#comment72157610829670409
I would love to ask you a few questions if possible. I am currently researching the company? Thanks
I had my polyofoto turned into a custom metal sign. I saw this interesting site that's worth taking a look at if you like metal signs!
http://www.modernabstractdecor.com/custom-metal-business-signs
My sister had Polyfoto for his son and she printed out also for stickers. I find it very interesting and planning to have it mine as well.
To get the best way out of this mess, explore the world of DPS Dave. Undoubtedly, DPS Dave’s picture scanning service is counted among the best digital photo scanning and editing companies. DPS Dave services utilize the most effective and protective means of keeping those cherished memories in their best form that will last with you forever.
Post a Comment
<< Home